How to Clean and De-rust a Barbell (Simple Tips)
Reviewed by: Oleksiy Torokhtiy (21 years of Oly Lifting experience)
This tutorial will teach you how to clean a barbell easily in a few steps using items commonly found around the house or found at any department store or large supermarket. We’ll also show you how to clean a rusty barbell and restore it to be as good as new if you happen to have one lying around. Let’s dive in.
How to clean a barbell? These are the essentials of barbell cleaning: Wipe it after every use to remove sweat. Biweekly, clean the shaft and knurling using 3-in-1 oil. About every three months, disassemble the sleeve and clean underneath it. Clean rust off barbells preemptively to preserve the metal.
How Often Should You Clean Your Barbell?
The frequency at which you should clean your gym equipment will depend on several factors, including how often you use it, how well you store it, but also your cleanliness preferences. If you find joy in having things clean, by all means, clean your barbell as often as you’d like. However, for most of us, cleaning is a chore we’d rather take on only when necessary.
So, how do you decide if it’s time to clean your barbell? Apart from adopting a regular cleaning schedule, two simple things you should consider are: does the knurling feel good to use and are the sleeves spinning without issue? If the answer to these questions is no, then it’s a good time for barbell maintenance regardless of how much time has passed.
Naturally, using it more often and having it used by multiple people warrant more frequent barbell cleaning. In other words, the rules are not the same for public gyms with various users compared to home gyms used by one or two people. Here’s a helpful general guideline based on the specific setting:
| What To Clean | Commercial Gym | Home Gym |
| Knurling and shaft | Every day | Every one to two weeks |
| Under the sleeves | Every month | Every three months |
| Rust removal | As required | As required |
How To Clean A Barbell – Step-By-Step Guide
Barbells take on all kinds of dirt and debris from regular use. For example, dead skin cells, oils, and chalk can accumulate on the knurling, making the barbell harder to grip. Additionally, regular dirt or rust can occur on the shaft and sleeves (especially underneath), which can ruin the look of your barbell and make a mess at your workout station.
Luckily, essential barbell care is fairly easy to do by one person at home. You don’t have to be an expert in metallurgy or have specialized tools to do it either. Barbells across the globe are generally standardized as far as construction and dimensions go, so you can use the same tools and cleaning methods regardless of where in the world you’re located.
These items can be found at any hardware and home improvement stores or bought online:
- A nylon cleaning brush
- A can of lubricant (for example, WD-40)
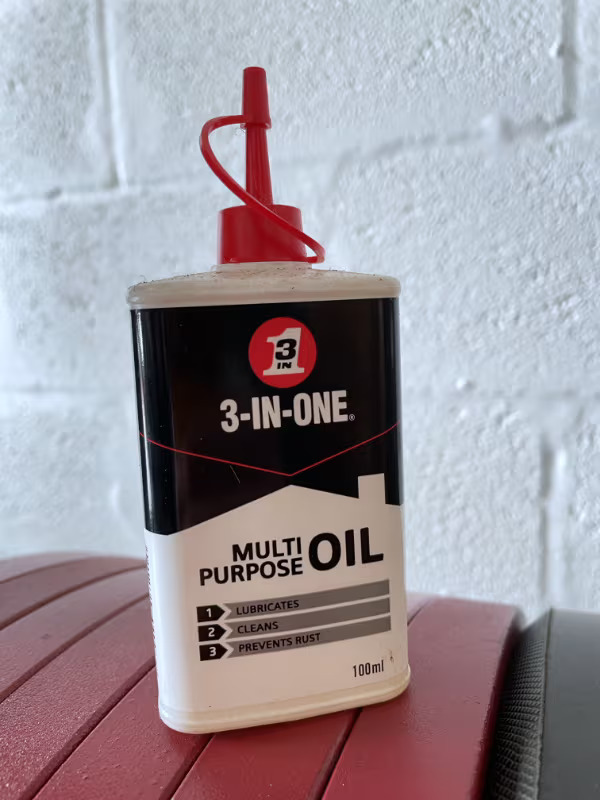
- A bottle of 3-in-1 oil
- Rust remove (or white vinegar)
- Something to wipe it down with (oil rag, towel, old t-shirt)
- Snap ring pliers
- A magnet (useful, but not necessary)
1. Cleaning The Shaft & Knurling
Start by wiping down the barbell with a clean cloth or rag to remove the top layer of dust and debris. Taking care of the smooth section of the shaft (including the sleeves) is the easy part. Simply apply some 3-in-1 oil and wipe it down until it’s nice and clean.
Knurling can be a bit trickier, though. The fine diamond pattern found on most barbells is a dirt magnet — it’s not uncommon to see patches of chalk and dead skin mixed with a layer of sweat on top of it. Start by applying some cleaning oil and let it sit for a minute or so. Then grab the nylon brush and make your way around the knurling with it. Make sure to brush in multiple directions, including up and down, left and right, and circular, to get into it from as many angles as possible.
Keep brushing until you’re happy with the result, then apply another layer of oil and wipe it off to give it a nice finish. Once that’s done, use a clean cloth to remove all excess oil from cleaning your barbell. Depending on the level of dirt, this may take a few minutes but is fairly straightforward.
If a stain is giving you trouble, you can use a mixture of white vinegar and water to create a homemade cleaning solution. White vinegar naturally contains acids that can break down all kinds of surface-level dirt, even rust. Here’s how to make one at home.
2. Cleaning Under The Sleeves
This is probably the hardest part of barbell care, yet it’s as easy as one-two-three with the right tools. To thoroughly clean under the barbell sleeves, you’ll need to remove them first, which involves disassembling them piece by piece.
It’s important to note that while most barbells have a similar inner sleeve construction, minor differences in part order may occur between manufacturers. In other words, don’t worry if your parts aren’t in the exact order we’re about to mention — just keep removing them as you progress.
First, examine your barbell sleeve cap — the edge of the sleeve where you typically find branding and weight information. On top of this, you should see a metal disc with two small holes encircling the cap, also known as the snap ring. Insert the snap ring pliers into the holes and gently squeeze them together until the disc pops out. Be careful not to squeeze too hard, as the ring could break or fly off.
Once the first ring is out, it’s time to remove the metal cap. Simply slide the sleeve backward on the shaft, and it should come off on its own. Place it to the side and continue sliding the sleeve back. At this point, you might encounter another snap ring, though this isn’t always the case.
Next, you’ll encounter a metal disc called the washer — remove it and set it aside. After that, some barbells have a shim (also a metal disc) — remove this as well. Behind it (or if your barbell doesn’t have a shim), you’ll find two half-washers. Remove these to expose the final washer, remove that too and you’re done. Now you can slide the sleeve off to expose the shaft underneath.
The parts should be easily removable by hand, or you can use the magnet we mentioned earlier to catch them. While it can make things easier to move around, it’s not necessary. Some higher-quality barbells have a single metal shell casing containing the entire construction we just described. If that’s the case, then your job is even easier — slide it off and that’s it.
During your first few attempts, we highly recommend doing one sleeve at a time to avoid mixing up the parts. Additionally, place each part down in a separate place in the order you remove them, so you don’t lose them or forget their position. When you’re finished cleaning, put them back in reverse order, finishing with the snap ring once again.
Underneath the sleeve is typically the dirtiest part of a barbell. However, cleaning it is essentially the same as for the shaft. Apply oil and use the rag to wipe it down until it’s clean. Then clean inside the bushings from each side. Wipe down the shaft and apply some lubricant on each side where the bushing makes contact (it should be obvious from wear and tear). Now slide the sleeve back on and give it a few spins to spread the oil around.
Finally, clean each of the parts you removed and put them back on. Once it’s reassembled, finish off by spraying a bit of WD-40 lubricant into the bushing. Depending on the metal quality and cleaning frequency, you might find some rusty spots underneath the sleeve. In the next section, we’ll discuss how to clean rust off barbells.
How To Remove Rust From Barbells?
Rust (Fe2O3), scientifically known as iron oxide, forms through a chemical reaction involving iron, air, and moisture. This process is known as Corrosion and can occur on any material containing iron, even stainless steel. Rust itself isn’t alarming; it’s a superficial layer that can be easily cleaned. However, if left unattended over time, it can start to dig into the underlying metal, especially if it has a thin layer of coating on top.
Beyond air and moisture, common factors contributing to rust include salt and high temperatures, frequently encountered during exercise. Put simply, allowing sweat (comprising moisture and salt) to accumulate on your barbell and subsequently oxidize post-workout could lead to rust formation. This explains why rust is often found on the knurling or sleeves, places where direct contact with your palms is common (gripping the barbell and putting plates on and off)
Hence, we can conclude that the primary cause of rust on barbells is excess sweat left on after usage. In other words, the best way to prevent rust is to wipe the sweat with a clean rag or towel after every workout, irrespective of your biweekly barbell maintenance routine.
Here’s how to remove rust from barbells: 3-in-1 oil is strong enough to penetrate and clean off small layers of it. However, for tougher spots, you’ll need to apply a few sprays/pumps of your rust dissolver of choice. There are products specifically advertised as barbell rust cleaners, but a simple department store rust remover works just fine.
Alternatively, you can use the same white vinegar and water mixture for barbell rust removal, too. You’ll immediately notice how it starts to dissolve rust, even before you start rubbing it in. After a few minutes, grab your nylon cleaning brush and give it a good scrub. Depending on the level of rust, this can take a few minutes or more.
Once you’re done, clean it off with a bit of 3-in-1 oil then rub it off with a clean cloth or rag. Now, how to keep a barbell from rusting in the future? Simply follow our regular maintenance guidelines and the likelihood of rust will be significantly reduced. Removing rust from barbells should be done preemptively to keep the metal intact.
Different Methods Of Cleaning Your Barbell
Your barbell requires regular maintenance, but you don’t need to clean it thoroughly after every use. Here are some common methods of barbell care and how often they should be done.
1. Wiping It Off
Ideally, you want to wipe your barbell with a clean cloth or towel after every single use. You don’t need to dig in or do it thoroughly, just make sure to especially wipe the parts you touched.
2. Cleaning With Brush And Wipe
This is your basic level of barbell maintenance and something that should be done every day in public gyms or biweekly for your personal/home equipment.
3. Cleaning With Vinegar Soak
This method is ideal if you’re having trouble with a hard stain or removing rust from barbells. It should be done as required, but it’s also a good idea to do every month or so even if it’s not immediately obvious that it’s necessary.
Barbell Cleaning Kit We Recommend – Rogue Barbell Cleaning Kit
Rogue Fitness is a renowned global brand in the realm of fitness equipment, known for producing some of the finest barbells available. Their extensive expertise in this domain has helped them create a simple yet useful solution for your barbell cleaning needs. Each Rogue Barbell Cleaning Kit contains the perfect nylon bristle brush, as well as a 3oz bottle of 3-in-1 oil. Both items are manufactured in the U.S.A. and geared towards barbell care, making this a no-brainer purchase, especially for beginners.
FAQ
What Do You Need To Clean A Barbell?
In short, to clean a barbell, you’re going to need:
- A cleaning brush (preferably with nylon bristles)
- A container of lubricant
- A vial of 3-in-1 oil
- A rust-dissolving solution (or white vinegar)
- A cloth for wiping (oil rag, towel, or old t-shirt)
- Snap ring pliers
Can You Clean A Barbell With Water?
Cleaning a barbell with water is technically possible, but isn’t recommended for several reasons. If you were to use water to clean your barbell, you’d also have to wipe it down thoroughly immediately, as leaving behind traces of it can lead to corrosion. Excess water can also get inside the sleeves and interfere with the lubrication and bushings, too.
Furthermore, not all water is of equal quality. Depending on where you live, your water supply may contain chemicals that can damage the metal. For example, Chlorine is commonly used in treating water meant for consumer use, as it’s efficient at killing bacteria. However, it’s also highly corrosive.
Is Rust On A Barbell Bad?
Discovering rust on your barbell might not be ideal, but it’s certainly not a cause for alarm if promptly addressed. Using a rust remover soak or a simple homemade solution like a blend of White Vinegar and water, you can remove accumulated rust and restore the professional appearance of your barbell.
Conclusion
This marks the end of our barbell maintenance tutorial. Remember, the best way to prevent potential damage and ensure the longevity of your barbell is preemptive cleaning.
This includes giving it a quick wipe from sweat after every workout, biweekly cleaning of the shaft and knurling using 3-in-1 oil, disassembling and cleaning under the sleeve every three or so months, and immediately addressing rusting spots.
Now you know how to clean a barbell. Do you have a favorite set of barbells you’d like to keep clean? Also, do you have an old barbell lying around you’d possibly want to restore?
Let us know by leaving a comment and make sure to follow us on social media for more valuable fitness content.
Also read:
- Trap Bar vs Barbell Deadlift
- Trap Bar Exercises
- Best Trap Bar
- Trap Bar Deadlift
- Best Bumper Plates
- Olympic vs Standard Barbell
- Best Pull up Bar for Home
References:
- “How does rust work?” 15 August 2000. HowStuffWorks.com. (Accessed 11 August 2023)
- “White Vinegar: Ingredients, Uses and Benefits” Healthline.com (Accessed 11 August 2023)
- Susan Stocker & Amber Crain “How to Make a Vinegar Cleaning Solution” wikiHow.com (Accessed 11 August 2023)
- Chlorine, © Royal Society of Chemistry 2023 Rsc.org (Accessed 11 August 2023)
- Peter A. Claisse, “Corrosion”, ScienceDirect, https://www.sciencedirect.com/science/article/abs/pii/B9780081002759000310 (Accessed 10 Oct 2016)
Why Trust Us?
With over 20 years in Olympic Weightlifting, our team does its best to provide the audience with ultimate support and meet the needs and requirements of advanced athletes and professional lifters, as well as people who strive to open new opportunities and develop their physical capabilities with us.
By trusting the recommendations of our certified experts in coaching, nutrition, dietology, and sports training programming, as well as scientific consultants, and physiotherapists, we provide you with thorough, well-considered, and scientifically proven content. All the information given in the articles concerning workout programming, separate exercises, and athletic performance, in general, is based on verified data. We ensure that you can rely on our professionals’ pieces of advice and recommendations that can be treated as personalized ones which will benefit you and fully meet your needs.
The product testing process is described in more detail here
Author: Ihor Shymechko
Pro Olympic Weightlifter, Coach
Best Results: Snatch – 208 kg,
C&J – 240 kg
Ihor has been a professional weightlifter since 1996, boasting over two decades of competition experience. His notable achievements include clinching the European Championship in 2009 and securing a silver medal in the 105kg division at the Senior World Championships in 2011. Ihor represented his country in the 2008, 2012, and 2016 Summer Olympics. After retiring from competitive weightlifting, he transitioned to coaching, leveraging his vast experience to guide athletes who now compete on both national and international stages.
Reviewed by: Oleksiy Torokhtiy
Olympic Weightlifting Champion
Best Results: Snatch – 200 kg,
C&J – 240 kg
Oleksiy Torokhtiy is a professional athlete boasting 20 years of experience in Olympic weightlifting. With multiple European and World titles under his belt, he has showcased his prowess in two Olympic Games (Beijing 2008 and London 2012). Upon concluding his illustrious career, Oleksiy dedicated himself to coaching. By 2022, he had conducted over 200 weightlifting seminars worldwide. He is the visionary behind an international sportswear and accessories brand known for its motto, “Warm Body Cold Mind.” Additionally, he is an esteemed author and the creator of a series of training programs and eBooks.

